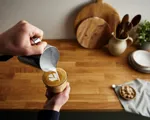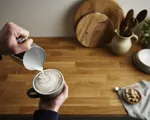
Finish off your latte in style with some pro-style latte art. Whether you’re a beginner or advanced, here are the best latte art designs and how to do them.
Latte Art Key Ingredients:
- Arla Barista milk
- Espresso
Equipment needed:
- Coffee machine
- Milk jug
- Mug
- Spoon or stirrer
Latte Art Jargon Explained
- Aerate – When you add micro-bubbles to your milk to increase its volume and create a velvety texture.
- Steaming – Adding steam to your milk for aeration.
- Dispense time - How long it takes for your coffee machine to brew and dispense your coffee. Dispense time can affect the flavour of your coffee in terms of sweetness, acidity and bitterness.
A Quick Guide To Latte Art How to make a latte
- Step 1: Measure and tamp down your coffee
- Step 2: Brew your espresso shot (1 or 2)
- Step 3: Aerate your milk
- Step 4: Choose your design
- Beginner
- Intermediate
- Advanced
Barista Tips: How To Latte Art
Here are a few tips and insights to speed up your journey to silky, fine art designs on top of your coffee.
Milk Texture: How To Froth Milk For Latte Art
Correctly textured milk is effectively your ‘paint’ that you apply to your ‘canvas’ - the coffee. Aim for a low level aeration in your milk when steaming it for latte art; around 20-33% milk volume growth. When steaming, aim for a calm and quiet approach and avoid the loud screeching that can sometimes happen. Tiny noises means tiny bubbles - this is the goal for latte art pouring. You can tell you have textured perfectly for latte art when you swirl milk in the jug after steaming. If it has grown by 20-33% and the milk runs down the inner metal wall of the milk pitcher, leaving only a thin layer of foam stuck to the inner side of the jug, you’re at a good level of fluidity. If it swirls and moves reluctantly like a thick cream, your milk may be too thick for a finely layered design, and may suit only a larger, simple design or a thick foam top.
Milk Polishing
Polishing milk might sound like a strange phrase but it means prepping it to be super shiny, glossy and with minimal bubble size. The perfect start is to get the milk spinning in the jug in a sort of whirlpool motion by finding an off-centre position for the steam arm. Not too deep, not out of the milk, and encouraging a consistent spin while adding your bubbles. If you can get your milk to spin and break down the bubbles you add to be at their minimum possible size while still properly aerating, your foam will not only look shiny and beautiful for art creation, but it will also taste silky and velvety for an amazing sipping experience.
Spout Proximity
You won’t be able to pour latte art well if your milk jug’s spout is too far from the coffee’s surface. Likewise, if you actually dip the spout of the milk jug into the liquid or pour too close you may increase your pouring speed too much and shoot your milk foam right to the far side of the cup without intention. Think ‘pen to paper’ when you are ready to pour your design onto your coffee and milk mixture, and ‘draw’ or ‘paint’ calmly to glide your art gently across the surface.
Pour Speed/Flow Rate
Too fast and your art grows and spreads faster than you can control. Too slow and you may not encourage the foam to flow out of the jug at all! Equally, when filling the cup before even attempting a design, you need to pour at a speed that allows the coffee and milk to mix and integrate evenly, but one that does not create currents and waves in the cup (these often show up as the wispy, white marks surrounding a latte art design). Pouring very fast may reduce the clarity of your design. Pouring too slow may mean your designs end up too small.
Rotation/Tilting
To glide art effectively across a liquid surface, angles are crucial. Tilting your cup towards your milk jug can really help you gain access to the liquid surface at the right time to pour a design without rushing or suffering from too little space available. Often, latte artists are tilting the cup throughout the pour but, crucially, when the cup is around two-thirds full you can begin to pour a complex design without struggling to start the first layer.
Latte Art Designs
Overcomplicating designs is another easy mistake to make - master the basics first before you move on to more complex designs.
Latte Art For Beginners
When you’re taking your first steps into the world of latte art, you’ll want to start with something simple. A heart or flower shape are great places to start. Once you’ve mastered these, you’ll be surprised at what you can create.
Heart Latte Art
The heart is fundamental to finishing many other designs, and is usually our go-to for any shape or design of cup.
How To Do A Heart Latte Art
- Pour your freshly steamed milk into the espresso until the cup is about half full and you start getting down to the microfoam in your jug.
- Hold the jug closer to the surface of the coffee to gently pour the microfoam on top.
- Make a wide circle shape with the foam before pouring the final milk foam in a line through the circle to form a heart. Or you can draw a line with a toothpick to get the heart shape.
Tulip Latte Art
The tulip or ‘stacks’ in the barista world are an essential technique, helping you to learn the skill of creating layers. They force you to reflect on speed, angles and rhythm in the pouring as you must start and stop during the process.
How To Do A Tulip Latte Art
- Pour your freshly steamed milk into the espresso until the cup is about half full and you start getting down to the microfoam in your jug.
- Hold the jug closer to the surface of the coffee to gently pour the microfoam on top.
- Create a white dot of foam on one side of the cup, then create another next to it. Add as many dots as you like or that you have room for.
- Pour a final line of milk through all the dots to form the tulip, or use a toothpick to join them all up.
Rosetta Latte Art
A design like the rosetta or fern leaf is another type altogether, poured a little faster and with a different motor pattern to the others. Difficult to shape correctly and frame to a cup size perfectly, you can find value in learning each design with a lot of patience, without the need to complicate things until you’re at a good level of mastery.
How To Do A Rosetta Latte Art
- Pour your freshly steamed milk into the espresso until your cup is about half full and you start getting down to the microfoam in your jug.
- Hold the jug closer to the surface of the coffee to gently pour the microfoam on top.
- Pour at a steady pace into the middle of the cup and begin slowly wiggling the jug from side to side.
- As you move the jug, layers will start to form and slowly flow away from where you’re pouring, creating the Rosetta shape.
- Once the pattern has filled the surface of the coffee, pour one final line of milk down the centre to give it a symmetrical floral shape,
Intermediate Latte Art
Now you’ve mastered hearts, tulips and rosettas, it’s time to take your latte art skills to the next level. Intermediate latte art designs include swans and wing tulips. Let’s look at what they are and how to do them.
Swan Latte Art
How To Do A Swan Latte Art
- Pour your freshly steamed milk into the espresso until your cup is about half full and you start getting down to the microfoam in your jug.
- Hold the jug closer to the surface of the coffee to gently pour the microfoam on top.
- Start by pouring until you get a half moon shape on one side of the cup - this will be the body of the swan.
- Similar to a Rosetta, pour into the same spot and bring the jug towards you while gently wiggling - this will form the wing.
- Once you reach the other end of the cup, pour a line back to the body to form the front of the wing.
- Keep pouring and come back up again to form the swan’s neck, adding a little turn at the end to create a small heart shape for the head.
Wing Tulip Latte Art
How To Do A Wing Tulip Latte Art
- Pour your freshly steamed milk into the espresso until your cup is about half full and you start getting down to the microfoam in your jug.
- Hold the jug closer to the surface of the coffee to gently pour the microfoam on top.
- As with the regular tulip, start with a dot on one side of the cup, but pour it quickly while gently shaking the jug from side to side. This should cause the milk foam to fan out and form the wing around the cup.
- Finish with more dots as with the regular tulip, and add a final line if you like.
Advanced Latte Art
With your new-found and well-practiced latte art skills it’s time to move on to advanced latte art. Let’s look at how to create a latte art seahorse and dragon.
Seahorse Latte Art
How To Do A Seahorse Latte Art
- Pour your freshly steamed milk into the espresso until your cup is about half full and you start getting down to the microfoam in your jug.
- Hold the jug closer to the surface of the coffee to gently pour the microfoam on top.
- Start with a classic tulip pattern on one side of the cup, using about three dots to form a small flower shape - this will be the seahorse’s back fin.
- Using the Rosetta technique, draw the seahorse’s body from one end of the cup to the other, curving around the tulip you just made, and with a curl at one end for the tail.
- Finally, draw the head with simple wide lines, leaving a clear spot for the eye.
Dragon Latte Art
How To Do A Dragon Latte Art
- Pour your freshly steamed milk into the espresso until your cup is about half full and you start getting down to the microfoam in your jug.
- Hold the jug closer to the surface of the coffee to gently pour the microfoam on top.
- Using the Rosetta technique, start at one side of the cup and draw out a long, coiled dragon body by gently shaking the jug from side to side as you pour.
- While still pouring, stop shaking the jug to create a smooth, curving line to form the dragon’s neck.
- Finally, add details to the head like horns and spikes using a toothpick. You can also create a mouth and eyes in this way, or even a long snaking tongue!
Latte Art FAQs
Can you do latte art with hot chocolate?
Of course, you can do latte art with hot chocolate. Whether you’ve perfected your latte art heart or you’ve moved on to advanced latte art, you can create art on top of your hot chocolates using the exact same technique. You can also do it on a chai latte or any other hot drink made with steamed milk.
What's the easiest latte art?
Probably the easiest latte art and the best place to start as a beginner is with a heart shape.
Does the mug matter for latte art?
Yes, the mug does matter. For professional latte art, we recommend using a proper latte cup with a shallow but wide rim. This gives you more space to pour your design.
Do you need hot milk for latte art?
For latte art, your milk should be hot but it doesn’t need to be too hot. For the best latte complete with latte art, aim for milk between 60-65C.
