Granola bars
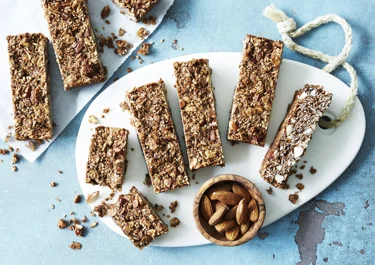
Discover the joy of snacking you can feel good about with our homemade granola bars, blending a variety of textures and tastes into a delightful treat. Made with care, these bars combine oats, nuts and a hint of honey for natural sweetness and a satisfying crunch. Whether you enjoy dark chocolate or dried fruits, this recipe welcomes your personal touch. So, heat your oven and get ready to make a snack that might just become your new favourite.


Ingredients
|
100 g
Almonds, roasted and roughly chopped
|
|
|---|---|
|
50 g
Sesame seeds, toasted
|
|
|
50 g
Coconut flour
|
|
|
100 g
Rolled oats
|
|
|
50 g
Finely chopped dark chocolate (approx. 80%)
|
|
|
¼ tsp
Fine salt
|
|
|
25 g
Butter
|
|
|
5 tbsp
Honey
|
Instructions
Questions about granola bars
Make a batch of our homemade granola bars to satisfy your snack cravings easily. Wondering how to customise them or prevent them from crumbling? Read on as we answered common questions to help you enhance your snacking experience.
What can I add to my granola bars for variety?
You can personalise your granola bars with many mix-ins to match your preferences: Nuts like pecans, walnuts, almonds or peanuts can be added whole or chopped for extra crunch, or as nut butter for a nuanced flavour. Seeds such as pepitas or sunflower seeds bring a wonderful texture. Chia or flax seeds are also great options, but limit them to a ¼ cup since they soak up moisture. Coconut, either grated or flaked, adds an extra tropical flavour to the coconut flour already included in our recipe. Dried fruits like cranberries, cherries or apricots provide chewy sweetness. Start with a ratio of ¾ of a cup to one batch of our granola bars, adding more until you have reached the desired balance. No matter which combination you choose, make sure they are similar in size for even mixing.
Why do my granola bars crumble when I cut them?
To keep your granola bars from falling apart, press the mix firmly into the baking tin before you chill it. The butter and honey work together to bind the ingredients, so packing them tightly is key. Also, let the bars chill for at least two hours to set and become firm, which helps prevent crumbling when you slice them.
Can I use different types of oats?
Yes, you can use either old-fashioned rolled oats or quick-cooking oats in this recipe, depending on the texture you prefer. Old-fashioned rolled oats will give your granola bars a chewier texture, while quick-cooking oats will make the bars smoother as they blend in better. Avoid using steel-cut oats, as they don't soften properly for granola bars. If you find old-fashioned oats too chunky, you can pulse them in a food processor for a bit to break them down, achieving a finer texture like quick-cooking oats.


How to perfectly press your granola bars
To ensure your granola bars stay intact and delight with their texture, pay close attention to combining your ingredients and pressing them into the pan. Begin by thoroughly blending the dry and wet ingredients to coat every piece evenly. When moving the mixture to your baking tin, press it down hard with a flat, heavy object like the bottom of a jar or pot. Follow up by pressing down with your hands to smooth the edges and corners. This firm pressing is essential to keep the bars from falling apart.
Master the art of toasting for richer flavour
Enhance your granola bars' taste by toasting the oats and almonds just right. Start by heating your oven to 175 °C and spread the oats and almonds on a tray. Toast them for 5-10 minutes until they turn a light golden colour. Keep an eye on them to avoid burning. This extra step brings out a deep, nutty flavour and adds crunch to your granola bars. After toasting, mix these aromatic ingredients into your wet mixture for a perfect blend of flavour and texture.
Maximise freshness with proper storage
To keep your homemade granola bars fresh and tasty, wrap each one in parchment paper or plastic wrap and store at room temperature. They'll stay fresh for a few days. If you need to keep them longer, place them in an airtight container in the fridge for up to two weeks. For the longest storage, freeze the wrapped bars in a freezer-safe bag where they'll keep their flavour for several months. When you're ready for a snack, simply thaw at room temperature and enjoy!
Can I freeze granola bars?
Yes, you can freeze homemade granola bars for up to two months. Simply arrange the bars in a single layer on a baking sheet and cover them. Freeze until they're solid, which might take a few hours, or you can leave them overnight. Once solid, transfer the bars to a freezer bag or container. Thaw them at room temperature when you're ready to enjoy a tasty snack.
Can this snack be made in larger batches for a party or gathering?
Absolutely! Simply adjust the ingredient quantities proportionally and use a spacious mixing bowl or stand mixer for thorough blending. Press the mixture firmly into a larger baking tray or multiple trays, ensuring even distribution and follow the rest of the recipe. To transport them, stack the cooled bars in layers separated by parchment paper in sturdy containers. Consider refrigerating them beforehand, especially in warmer weather, or use a cooler bag packed with ice packs for longer journeys. With these tips in mind, you can effortlessly create a plentiful supply of these delightful snacks to share with all your guests.
Can I make my granola bars less sweet?
Yes, you can cut down on the honey to reduce sweetness. Keep in mind that honey helps the bars stick together, so using less may make them crumbly. For a different sweet taste that still binds, try equal parts maple syrup or brown rice syrup instead of honey. It's important to balance taste and texture when adjusting sweetness. Start by slightly reducing the honey and check if the bars still hold their shape and meet your taste preference.
What can I serve my granola bars with?
Our homemade granola bars complement many beverages and fit into different meals. Crumble them onto your quinoa porridge or layer a few into this decadently creamy raspberry trifle. You can also use the granola bars recipe as base for your next skyr cheesecake or as a crunchy addition to our pear ice lollies.
Enjoying these bars with a warm cup of coffee or tea in the afternoon enhances their rich, nutty flavours.
Make gluten-free granola bars
To make our granola bars gluten-free, always use oats with a certified gluten-free label. The process remains the same: blend the ingredients, then press the mixture into a baking tray and bake until golden brown. These gluten-free granola bars will offer the same delightful combination of chewy and crunchy textures.
Extra techniques for extra special granola bars
Discovering new ways to prepare granola bars brings excitement to this staple snack. The usual baking method works well, but no-bake alternatives can be quicker and offer a new take on this classic recipe. Using just heat and pressure, you can achieve the same chewy texture without an oven, though your bars might be crumblier and less firm. Simply follow the same recipe, but soften or melt the chocolate before mixing it into the batter to ensure it incorporates evenly. Also spend more time on firmly pressing the dough into the tray and store your bars in an airtight container in the refrigerator.
As an extra step to create granola bars that are firmer and offer more crunch, refrigerate the mixture after pressing it into the pan. Chill the bars for at least one hour, or up to a full day if time allows, which lets the oats soak up more moisture and bind everything together.
If you like extra crunch, press some more nuts or seeds on top before baking. Drizzle on melted dark chocolate after the bars have cooled to add texture and make them look great. Don't hesitate to try out spices, dried fruit or a bit of sea salt as extra ingredients or toppings.
The aim is to make granola bars that please the senses and suit your taste. Using these fresh preparation methods, you can make the process of creating granola bars a fun and imaginative culinary journey, resulting in a satisfying snack for any time of the day.