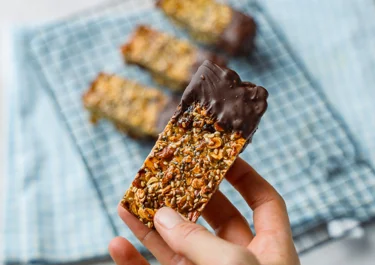
Protein breakfast bars with chocolate

Start your day with a burst of flavour from our homemade protein breakfast bars: blending the crunch of almonds and hazelnuts with the natural sweetness of dates and cranberries, all bound together by chewy oats, honey and peanut butter. A finishing dip in melted chocolate adds indulgence to every bite, perfectly balancing the crunchy texture and sweetness. Easy to prepare and packed with flavour, these bars are ideal for a quick breakfast, on-the-go snack, or a convenient addition to your meal prep routine.
Ingredients
|
15 g
Chia seeds
|
|
|---|---|
|
30 g
Flaxseed
|
|
|
25 g
Almonds
|
|
|
25 g
Hazelnuts
|
|
|
100 g
Finely rolled oatmeal
|
|
|
20 g
Pumpkin seeds
|
|
|
50 g
Dates
|
|
|
20 g
Cranberries
|
|
|
80 ml
Honey
|
|
|
20 g
Peanut butter
|
|
|
25 g
Plain flour
|
|
|
2
Eggs
|
Decoration
|
100 g
Chocolate
|
|
|---|---|
|
Salt, pinch (optional)
|
Instructions
Chill the protein breakfast bars overnight for best results
After baking and dipping in chocolate, allow your bars to chill overnight in the fridge. This resting period lets them firm up, making them easier to handle without crumbling. The time in the fridge also enhances the flavours, as the sweetness of the dates and cranberries melds beautifully with the nutty and chocolatey notes. Additionally, the chocolate coating hardens perfectly overnight, giving the bars a satisfying crunch with every bite. If you're prepping ahead, this step ensures your breakfast is ready to grab-and-go in the morning or enjoy as a satisfying snack.
Expert tips for chocolate dipping
To achieve a flawless coating, start by melting the chocolate gently and slowly. You can use the microwave, melting in short bursts (15-20 second intervals), stirring frequently to avoid burning. Alternatively, use a double boiler: place a heatproof bowl over a saucepan of simmering water (without the bowl touching the water) and gently stir the chocolate as it melts from the indirect heat. To dip, gently hold each bar by the edges or use tongs to lower it into the melted chocolate, allowing excess to drip off by lightly tapping it on the side of the bowl. After dipping, sprinkle with flake salt while the chocolate is still wet to ensure they adhere properly. Place them on a parchment-lined tray to prevent sticking and allow the chocolate to set in the fridge for a smooth, shiny coating.
Pressing techniques for perfect bars
Achieving an even bake and professional look starts with mastering the pressing technique. Once your mixture is ready, transfer it into your lined baking dish and use a spatula, the back of a spoon, or your hands to press it down firmly. Applying even pressure is essential for compacting the mixture, preventing crumbling when you cut the bars later. For a professional finish, place a sheet of parchment paper over the mixture before pressing. This prevents sticking and ensures a smooth, level surface. You can also use the flat bottom of a glass or measuring cup to press the mixture evenly across the pan. Make sure to pack the edges firmly, as these are more prone to becoming loose. Taking the time to press the mixture tightly ensures the bars hold their shape, bake evenly, and look picture-perfect once sliced.
Questions about protein breakfast bars
Start your day right with this homemade protein breakfast bar recipe. Whether you're wondering which type of chocolate works best, how to properly store them, or need tips for troubleshooting common challenges, we've compiled answers to guide you. With these tips, you'll master the art of creating a delicious, perfectly balanced breakfast every time.
What type of chocolate should I use for dipping
The type of chocolate you use can make a big change in flavour and texture of this recipe. For a rich and indulgent finish, opt for high-quality dark chocolate with at least 60-70% cocoa. Its slight bitterness perfectly complements the sweetness of the bars, creating a balanced flavour profile. If you prefer a sweeter option, milk chocolate is a great choice, offering a creamier, more indulgent taste. For added versatility, white chocolate can also be used, providing a subtle sweetness and a smooth finish.
How long can I store these protein breakfast bars?
This recipe can be stored in the fridge for up to four weeks, ensuring the bars remain fresh and delicious. To maintain their texture and flavour, place them in an airtight container or wrap them individually. They’re also freezer-friendly: simply wrap each one individually and store in a freezer-safe bag or airtight container for up to six months. When you're ready to enjoy, thaw them at room temperature or give them a quick warm-up in the microwave for a soft and chewy texture. This preserves their flavour, texture, and convenience, making them ideal for meal prep, long-term snacking, or busy on-the-go breakfasts.
Why are my bars crumbly?
A crumbly consistency can result from a few common issues. One key cause is not pressing the mixture firmly enough into the baking dish. Properly compacting the ingredients before baking ensures they bind together, creating a cohesive bar. Another factor could be an imbalance of wet and dry ingredients so be sure to measure the ingredients precisely. Too many dry ingredients can prevent the bars from binding properly, while too few wet ingredients might not provide enough moisture to hold everything together. Ensure you follow the recipe carefully, mixing thoroughly until the ingredients form a sticky, well-combined mass. Overbaking can also dry them out, so make sure to bake only until set and golden, avoiding excessive time in the oven.
Nutritional values
Nutritional value, per
1829 Kcal
| Fibre | 38.7 gram fibers |
| Protein | 44.9 gram |
| Fat | 107.7 gram |
| Carbohydrates | 170.8 gram |
Lightly toast the nuts for enhanced flavour
Level up your protein breakfast bars by lightly toasting the nuts and seeds. This step releases the natural oils and sweetness, enriching the flavour and adding a pleasant crunch. Simply spread the nuts and seeds on a baking tray and toast them in a preheated oven at 180 °C for 5-10 minutes, or until they turn lightly golden and aromatic. Keep a close watch to avoid burning.
How do I know the bars are done?
When the edges turn golden brown, and the surface feels firm to the touch, they’re ready. Another reliable indicator is the aroma – when they emit a warm, nutty, and slightly sweet scent, they’re likely baked through. If you’re unsure, insert a toothpick into the centre; it should come out clean or with a few crumbs, but not wet. Overbaking can make the bars dry, so aim for just-set edges and a firm centre for the perfect chewy texture.
Cutting techniques for perfect protein breakfast bars
Allow them to cool completely after baking, or better yet, chill them in the fridge for at least 30 minutes before cutting to ensure clean, even slices. Use a sharp chef’s knife or a serrated knife for the best results, and wipe the blade clean between cuts to prevent sticking. To achieve uniform pieces, lightly mark the top of the bars before slicing, and apply steady pressure as you cut.
For added flair, experiment with creative shapes using cookie cutters, or opt for diagonal cuts to create elegant diamond shapes.
Make your own peanut butter
Elevate your protein breakfast bars by creating your own homemade peanut butter, allowing you to customise its texture and flavour to perfectly complement this recipe. With just peanuts, a food processor, and a bit of patience, you can whip up this protein peanut butter in minutes. The result is a rich, nutty spread that adds a homemade touch to your breakfast. Whether you prefer a smooth consistency or a crunchy texture, making peanut butter yourself lets you tailor it to your liking, ensuring your breakfast is as delicious as it is personal.
Wrap in parchment paper for a breakfast on the go
Make your protein breakfast bars even more convenient by wrapping them individually in parchment paper. This method keeps them fresh and portable, perfect for busy mornings or an on-the-go snack. Simply cut a piece of parchment paper large enough to wrap around the bar, fold it neatly, and secure with a piece of string or tape for a rustic, café-style presentation. Not only does this keep them intact, but it also makes them easy to grab and enjoy wherever your day takes you.


